Skip to Main Content

ProQuest RefWorks: Editing and Writing your Paper

New Refworks

About Write-N-Cite

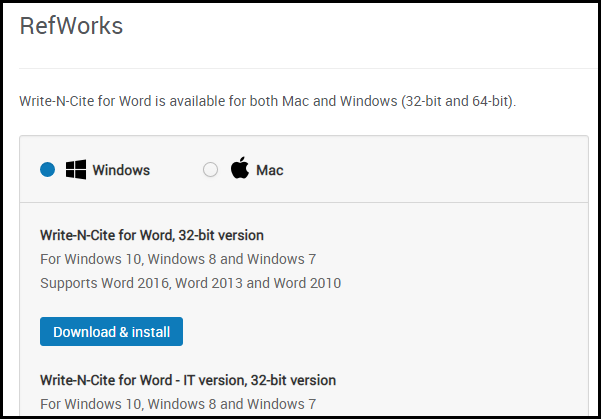
Write-N-Cite is a plugin for Microsoft Word that lets you run a simplified version of RefWorks inside of Word. Write-N-Cite enables you to access and cite your references while working in Word, even if you are currently offline.

Features:

  • Provides read-only access to your RefWorks account, enabling you to view and insert your previously collated references into your document, formatted using previously defined citation styles.
  • Uses codes to represent your references and bibliography entries. This enables Write-N-Cite to manage and update these entities. You can use Write-N-Cite to manage only the codes that it adds to your document; you cannot manage references added as plain text. Codes are surrounded by light square brackets and appear as plain text when viewing or printing the document.
  • You can add inline citations and an entire bibliography.
  • Enables you to bulk format all entities managed by Write-N-Cite.
  • Every time you log into Write-N-Cite, it automatically synchronizes with your RefWorks account.

RefWorks Citation Manager

RefWorks Citation Manager is a plugin for Microsoft Word that lets you run a simplified version of RefWorks inside Word. RefWorks Citation Manager is a newer, more modern version of Write-N-Cite.

RefWorks Citation Manager is available through the Microsoft Store and can be installed directly from Microsoft Word. By default, Office automatically updates RefWorks Citation Manager whenever a new version becomes available.

Features:

  • Provides read-only access to your RefWorks account, enabling you to view and insert your previously collated references into your document, formatted using previously defined citation styles.
  • You can add inline citations. Adding a citation also adds a bibliography to the end of the document. As you add or remove references, the plugin automatically updates the bibliography.
  • Every time you log into RefWorks Citation Manager, it automatically synchronizes with your RefWorks account.
  • Windows users of Microsoft Office 2016 users can choose whether to use Write-N-Cite or RefWorks Citation Manager. Mac users of Microsoft Office 2016 must use RefWorks Citation Manager.
  • Codes inserted by Write-N-Cite are not recognized by RefWorks Citation Manager, and vice versa.
  • RefWorks Citation Manager provides limited access to your RefWorks account, and does not enable you to make changes to your references.
  • If you have documents with codes that were added using RefWork Citation Manager associated with legacy RefWorks, RefWorks Citation Manager can convert these codes to (new) RefWorks. RefWorks Citation Manager cannot otherwise manage older codes.

Using Write-N-Cite

  1. In RefWorks, select Tools > Tools. The Tools page appears.
  2. In the Cite in Microsoft Word area, select Download & Install to download the latest version, or Other Windows and Mac Versions to download other versions. If you select Download & Install, the download starts. If you select Other Windows and Mac Versions, the Write-N-Cite for Word Download Page appears. Select the relevant version and select Download & Install to start the download.

    write_n_cite_download_page.png

     
    The available options depend on your operating system.
Start the installation and follow any on-screen instructions. After installing the plugin, a RefWorks ribbon appears in Microsoft Word.

WNC Login


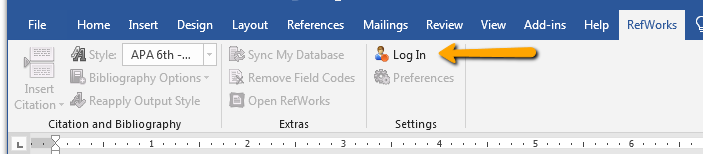
In the ribbon, select Log In to log into RefWorks. Synchronizing data with your RefWorks account may take a few moments, especially on your first login.

When you open Microsoft Word, if you did not log out after your last session, you are still logged in. If not, select Log In from the RefWorks ribbon to log into RefWorks. If someone else was logged into this instance of Word, select Switch Accounts to log out and log back into your account.

  • If you need to reformat all of your entities, select Reapply Output Styles. For example, this may be useful when working with master and sub documents that have different citation styles.
  • To manually force a synchronization with RefWorks, select Sync My Database.
  • To convert all citations to plain text select Remove Field Codes.
    If you intend to continue using Write-N-Cite to manage citations in this document, we strongly recommend that you save a copy of your document before converting to plain text, as it cannot be undone.
To add or edit an inline citation:
  1. To create a citation, select Insert Citation > Insert New. To edit, double-click the citation. In either case, the Insert/Edit Citation pane appears.
    WNC Insert New Citation
     
  2. Use the folders and the search bar to locate the reference. You can right-click on it to see complete reference information.
    Full Reference Data
     
  3. Select the reference. A preview of the formatted citation appears in the Preview Citation area. Optionally select + in the Compose Citations area to add additional references to the citation.
    WNC Insert or Edit Citation
  4. Optionally configure any of the following while creating or editing a reference:
    WNC_Insert_Edit_Citation.png
    • Hide the publication year
    • Hide the author name
    • Add text before the reference (Prefix)
    • Add text after the reference (Suffix)
    • Hide the reference and only have the bibliography entry
    • Hide page numbers (Suppress Pages)
    • Add page numbers (Override Pages)
    • Change the reference order: Use the up or down arrows for styles that use first-cited order. For styles that use alphabetical or other sorting, select Override Default Ordering.
      Some options depend on the citation style. For example, adding or hiding page numbers works only for styles with page numbers.
  5. Select OK to insert or save the selected references. 
To insert a bibliography:

To insert a bibliography that includes all Write-N-Cite managed entities in your document, select Bibliography Options > Insert Bibliography.

  1. In Microsoft Word, select Insert > Store and search for RefWorks.

  2. RefWorks Citation Manager will be listed. Select Add to install; it opens in the right sidebar.
    If you close the sidebar, you can redisplay it by selecting Insert > My Add-ins > RefWorks Citation Manager.

    RefWorks-Citation-Manager-image2.jpg

     
  3. Log into RefWorks. Synchronizing data with your RefWorks account may take a few moments, especially on your first login. Once you are logged in, the sidebar updates with your references.

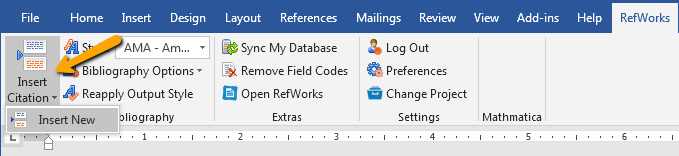
    If someone else was logged into this instance of Word, select Log Out in the action menu and log back into your account.

    RefWorks-Citation-Manager-image3.jpg


    An action menu is available on the left of the sidebar, and a configuration menu is available when you select the top right of the sidebar.

    refworks_citation_manager_configure_icon.png

     
  4. To set the citation style, select Change citation style in the action menu. A dialog box appears in the right sidebar. Select the style and select Update. Every time you perform this action, all citations and the bibliography will be updated to the new style.
To insert a citation:

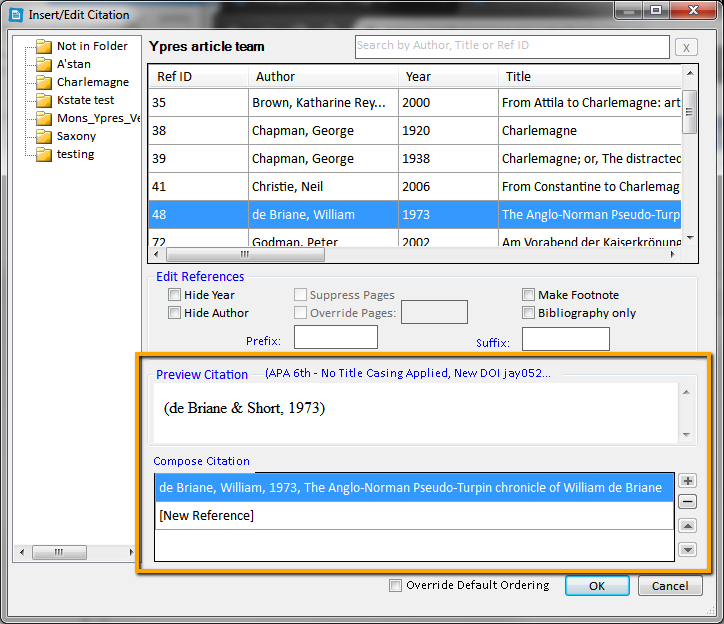
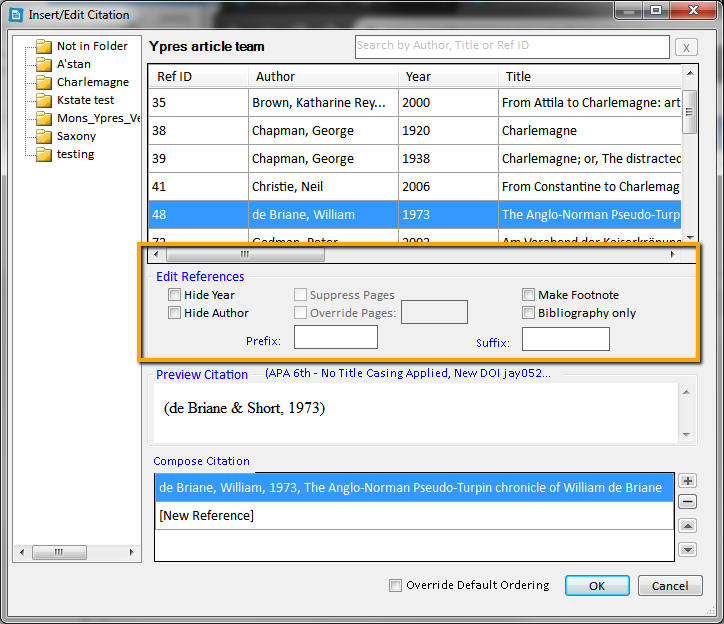
Select the reference and select Quick Cite. When you do, two things are added to your document:

  • An inline citation
  • A bibliography at the end of the document. If a bibliography already exists, the reference is added to it.
To configure the reference before inserting it:
  1. Select the reference and select Preview & Edit. The Preview & Edit pane appears. Full reference information appears at the bottom.

    refworks_for_google_docs_edit_citation.png

     
  2. Select to insert the citation inline.
  3. Optionally configure whether to change the page numbers, hide the author, or hide the publication year. A preview of the citation and the bibliography entry appears.
  4. Optionally add a prefix or suffix text to the reference.
  5. Select Insert Citation. An inline citation is added as well as a bibliography entry.

Additional actions:

  • Edit a citation – Move your cursor to anywhere in the citation. The information opens in the right sidebar.
  • Delete a citation – Select the entire citation, either by highlighting it with your mouse or by selecting the block element handle and pressing Delete. Select Update document in the action menu to update the bibliography.
  • Add a citation to a footnote – Create a footnote in Word and add a citation to it as you would add a citation inline in the text.
  • Refresh RefWorks – If you need to refresh the RefWorks pane, select Reload from the configuration menu.
  • View Source – For support use.
  • Security Info – Microsoft information about the plugin.